Seriously, how is it I've never melted crayons into shapes before???? Audrie was soooooooo excited about this and it was really, really easy. Not joking, really easy.

After the fun of making the Mailbox Valentine's Box, making these crayon valentines was a breeze. We looked for valentines at the store but the stock was pretty picked over. She can't take any kind of food or candy, so that limits the options. We hit Pinterest and found these crayon heart-shaped valentines from The Nerd's Wife.

I bought this heart silicone mold on Amazon for under $10 and it was delivered to my doorstep 2 days later. Gotta love Amazon.

I had no idea how many crayons we'd need to make 20 hearts but we bought a box of 64 thinking that'd surely be enough...and it was. I almost always buy generic brands but in this case, the Target brand was $.03 more (odd) so I went with Crayola.

The first step here involved the box cutter so that had to be done by me. I simply put a slice down the wrapper and most of the crayons came clean. For the wrappers that were apparently super glued on by an over-zealous gluer, soaking in hot water for just a few seconds took the wrapper right off.


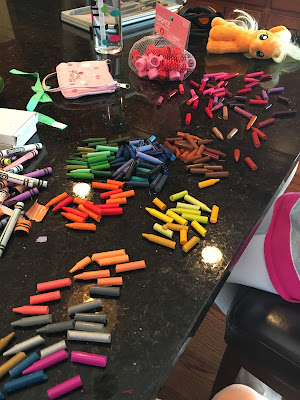
Audrie sorted the crayons by color while I cut the labels off. Here's what we had after de-wrapping and breaking up the crayons. Applejack was keeping an eye on our work.


We did end up breaking up the crayons a bit more from what's shown in this picture so we could fit more colors in each heart. The goal was to put like colors in each heart but, yeah, that didn't happen. Audrie just threw whatever she wanted in the mold.


A 64 count box of crayons made us 22 hearts. Some hearts weren't as big as others, there's no science to it.

We baked the crayons in the oven at 250 degrees for 15 long, agonizing minutes.


Lesson here, you should definitely put the mold on a cookie sheet. Not something I thought about when putting the crayons in the oven, as they were solid. However, taking crayon soup out of the oven in a floppy silicone mold is difficult. Some of our hearts spilled but it was all good. For the second batch, a cookie sheet was used and made things much easier.

Here's what we had after they hardened.


The hearts popped right out of the mold and were ready to go. Next step was to find the cards to attach them to. We could've created our own but I found this template from The Pretty Bee that's super cute so we used it.

We used hot glue to attach the hearts to the cards. The hearts had a lip on the back so before they could be attached to the cards, we had to rub them on a piece of sand paper for a second so the back would touch the card.


Here's what we ended up with. 


Just like the Mailbox Box, Audrie was very excited about taking these to her valentines at school which makes for one happy mamma.

E

First thing's first, BIG thanks to the hubby for making my page pretty. He's an awesomely talented guy.

It's almost Valentine's Day which means my inner craft geek gets to come out! Part of me gets really excited about this and part of me thinks it sounds like a lot of work. Luckily, Audrie and I were able to agree on a creative yet not-too-much-work box.

We searched Pinterest high and low. There were Pony and Minion boxes but we both liked this mailbox. I got the idea from this Little Red Window post. Her how-to is really good so if you're going to make this box, I highly recommend you follow her instructions. If you want some pointers on what not to do, read on. I'm very happy with our finished product but I guarantee ours took more time and more coats of paint than hers. Here's what we ended up with.


And, in a nutshell, here's how we got there. Audrie helped with the box but in the beginning, there wasn't much for her to do. I barely trust myself to handle a box cutter. No way I'm handing it to my 5-year old. She started patiently waiting to paint the box at 6pm on Friday. She waited awhile.

First step was cutting the longer flaps off the top of the box. This is where the arch of the mailbox will go.
If you know me, you know I've been talking about starting a blog for a long time. A really long time. People have been annoyed, undoubtedly, with all this blogging talk but no actual blog to show for it. Well, friends, now's the time. Why now? There's a few reasons but the main one is I've simply run out of excuses not to do it.

The biggest reason it's taken me so long to take the plunge is I couldn't decide what to write about. Seriously, our life isn't that spectacular. Who wants to read about the dinner we made, trip to the park we took, or other mundane goings-on of our family? What I ultimately decided is, I don't care. I like writing and I'd like to have something to show the kids down the road. I need proof we actually did fun things because, as we all know, kids tend to think they've been bored since they were born.